Rain Gardens: How to Use Native Plants to Manage Stormwater & Beautify Your Yard in Central Texas
Introduction
In Central Texas, heavy rainstorms and flash floods are part of the seasonal cycle. As home designs and subdivisions expand, impervious surfaces like driveways, patios, and sidewalks increase runoff, putting pressure on your property’s drainage system. But there’s a beautiful—and highly functional—solution: rain gardens.
At Culture Scapes ATX, we believe your landscape should do more than look good—it should work for you, year-round. Rain gardens are a powerful way to reduce runoff, filter pollutants, and recharge groundwater, all while adding native plant charm to your outdoor space.
In this guide, we’ll walk through:
-
What a rain garden is and why it matters in Austin-area landscapes
-
How to site and size a rain garden for your property
-
Best native plants and soil mixes for Central Texas rain gardens
-
Design ideas, hardscape integration, and aesthetic touches
-
Maintenance tips to keep your rain garden healthy long term
-
How Culture Scapes ATX can help you plan, install, and maintain your rain garden
Let’s dig in (pun intended).
What Is a Rain Garden — and Why Should You Care?
A rain garden is a shallow, planted depression in the landscape designed to collect, slow down, infiltrate, and purify stormwater runoff. Instead of rushing off your roof, driveway, or yard into storm drains, the water is given a place to linger, soak in, and feed plant roots.
Benefits of rain gardens include:
-
Reduced runoff and erosion. During heavy rain, water can flow too fast, eroding soil, washing away mulch, and dumping sediment into drains or neighboring properties. Rain gardens slow the flow and allow water to infiltrate on-site.
-
Water quality protection. As runoff flows through plant roots and soil, pollutants like sediment, nitrogen, phosphorus, and hydrocarbons are filtered out before they reach creeks, rivers, or aquifers.
-
Stormwater mitigation. Rain gardens lighten the load on municipal drainage systems, reducing flooding risk during high-intensity storms.
-
Wildlife habitat. Many native plants in rain gardens attract pollinators, birds, and beneficial insects.
-
Aesthetic appeal. With thoughtful design, rain gardens become focal points—combining color, texture, and seasonal interest—all while being functional.
-
Compliance & incentives. Some jurisdictions or stormwater districts offer rebates, credits, or incentives for green infrastructure installations like rain gardens.
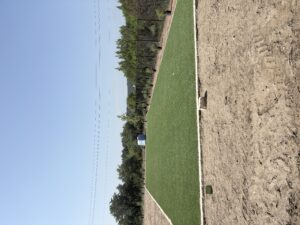
For homeowners in Austin, Cedar Park, Georgetown, and surrounding areas, rain gardens are a smart way to manage flash storms while enhancing your yard’s beauty and ecological health.
How to Plan Your Rain Garden: Site, Size & Slope
A successful rain garden starts with good planning. Here’s how to begin:
1. Pick a collection zone
Find where runoff concentrates: from your roof’s downspouts, driveway, patios, or low spots in your yard. Rain gardens should be 10–20 feet away from foundations, and slope downward away from structures. Never place a rain garden directly next to your house’s foundation unless there’s an impermeable barrier.
2. Measure drainage area (watershed)
Calculate the area draining into your garden. For example, a roof section 30 ft × 20 ft equals 600 ft² of catchment. The more area, the larger your rain garden must be to absorb water effectively.
3. Decide garden depth
Typical depths range between 4″ and 8″ (infiltration zone), depending on soil type. Heavier clay soils might require shallower depth or amended “underdrain” layers. Ensure the bottom is level so water spreads evenly.
4. Soil and underlay
Rain gardens work best when you dig out native topsoil and backfill with a blend: often 50% existing topsoil, 30% compost, 20% coarse sand or washed rock. This increases permeability. If subsoil is very clay-heavy, consider an underdrain (gravel + perforated pipe) to avoid standing water.
5. Overflow path
Design a safe overflow route for large storms so excess water can exit without damaging plants or adjacent landscapes. Use rock-lined swales or graded channels.
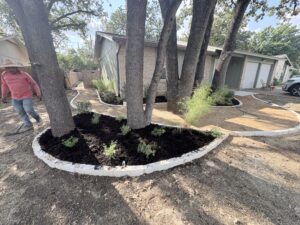
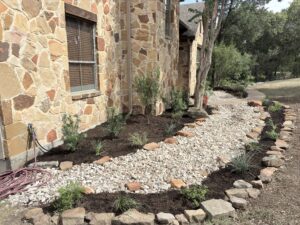
6. Contour and edge
Use berms (small soil mounds) or decorative rocks on the downhill edge to help hold water in. Use curves instead of straight lines for natural aesthetics.
Native Plants & Materials Ideal for Central Texas Rain Gardens
A big advantage of rain gardens is you can load them with native and adapted species—plants that already thrive in Central Texas heat, drought, and flooding events. Below are some recommended categories and species.
Grasses, Sedges & Carex
-
Muhlenbergia lindheimeri (Lindheimer muhly)
-
Schizachyrium scoparium (Little Bluestem)
-
Carex comans (Copper Sedge)
-
Uniola paniculata (Sea Oats, though coastal, sometimes used in transition zones)
These give movement, vertical texture, and tolerate intermittent wet/dry cycles.
Herbaceous Perennials & Wildflowers
-
Rudbeckia hirta (Black-eyed Susan)
-
Echinacea spp. (Coneflower)
-
Salvia spp. (Mealycup Sage, Texas Sage)
-
Liatris spp. (Gayfeather)
-
Penstemon spp.
-
Agastache rupestris (Sunset Hyssop)
Choose a mix of bloom times for seasonal interest and pollinator attraction.
Shrubs & Small Trees (for larger rain gardens)
-
Viburnum prunifolium (Blackhaw Viburnum)
-
Itea virginica (Virginia Sweetspire)
-
Oidium salvia (Texas sage)
-
Salix spp. (willow species, where water is more persistent)
Groundcovers & Spreading Plants
-
Asclepias tuberosa (Butterfly Milkweed)
-
Festuca ovina (Sheep Fescue)
-
Tradescantia spp. (Spiderwort) in part-shade zones
Mulch and Rock Accents
Use coarse river rock (½–1″) in shallow depressions or around plant bases to reduce erosion. Avoid fine bark mulch in the primary ponding area, as it can float or wash away. Use 1–2″ of decomposed granite or pea gravel for paths and edges.
Design Ideas & Hardscape Integration
Rain gardens can be beautifully integrated into broader landscape designs. Here are creative ideas:
Layered Planting
Arrange plants in zones: lowest, flood-tolerant species in the center, then mid-height perennials, and taller shrubs or ornamental grasses toward the edges. This offers natural transitions and visual depth.
Stepping-Stones & Paths
Embed stepping stones through the garden so you can access plants without compacting the soil. Use permeable materials like decomposed granite or stone pavers.
Accent Hardscape Features
-
Boulders or rock outcroppings can act as anchors and visual focal points.
-
Small dry creekbeds made of rock can channel overflow gracefully.
-
Seating elements (benches, logs) near the garden let you enjoy the space up close.
Lighting
Add low-voltage path lighting or uplights for specimen plants. At night, your rain garden can become an ambient focal point.
Water Features or Basins
In larger properties, combine a rain garden with a bioswale or dry pond. Occasionally, consider a shallow basin in the design as a temporary catchment—blended with plantings so it doesn’t feel like a puddle.
Transition Zones
Smoothly blend the rain garden into existing lawn or garden beds. Use a soft edge with mulch or groundcovers so it doesn’t feel like a sudden ditch.
Maintenance Tips for Long-Term Success
A rain garden is low-maintenance compared to traditional beds—but not maintenance-free. Here’s how to care for one:
-
Watering early on. In the first 6–12 months, help the plants establish with supplemental watering, especially during dry spells. After that, most rain gardens become mostly self-sustaining (except in multi-month droughts).
-
Weed control. Keep an eye out for invasive or aggressive weeds; they compete with young natives. Remove by hand or spot treat.
-
Mulch refresh. Top up mulch or rock yearly to maintain depth (2–3 inches in planting zones, less in ponding area).
-
Pruning & cleanup. Each spring, cut back dead stems; in fall, leave seed heads for wildlife. Remove debris that might block flow.
-
Check infiltration. After heavy rains, if water is still standing >48 hours, it may indicate compaction or clogging. Aerate or replace soil mix if needed.
-
Plant replacement. If a species fails, replace with something equally adapted and test that particular micro-location (sun/shade, moisture).
-
Seasonal interest. Add annual natives or bulbs for extra color in early spring or fall.
Why Culture Scapes ATX Is Your Ideal Rain Garden Partner
You already know us for landscape design, hardscaping, lighting, outdoor kitchens, tree work, and more. (We list all those services on our site.) CULTURE SCAPES
Here’s what makes us especially suited for rain garden projects:
Local Expertise
We understand Central Texas soils, rainfall patterns, native plant palettes, and drainage challenges. We know which plants thrive, where soils tend to be heavy, and how to design for uphill/downhill water flow in our region.
Holistic Design Approach
Our designs don’t treat rain gardens as afterthoughts—they integrate them seamlessly into walkways, patios, lighting, and outdoor rooms. We consider how your space is used socially, functionally, and visually.
Structural & Install Capabilities
We have experience with landscape construction and hardscape installation—so planning soil, grading, drainage, overflow channels, rockwork, and plant transitions is already in our wheelhouse.
Warranty & Support
We stand by our work. After installation, we offer follow-up and maintenance guidance to ensure your rain garden thrives. We also provide care guides customized to your property.
Consultation & 3D Visuals
We can show you concept renderings or graphics so you can “see” your rain garden in relation to your yard, patios, lighting, and circulation paths. This helps you feel confident before construction begins.
Sample Project Flow: From Dream to Reality
-
Consultation & Site Visit
We walk the property, observe drainage, slope, sun/shade, existing features, and soil conditions. We discuss your vision, style preferences, and functional goals. -
Design & Layout
We sketch options, show plant palettes, hardscape elements, overflow strategies, and edge treatments. You pick the version you love. -
Grading & Excavation
We excavate to the correct depth, shape the berms or edges, and create a level infiltration zone. Drainage piping or underdrain materials are placed if needed. -
Soil & Amendment
We blend topsoil, compost, and sand (or geotextiles) to ensure good infiltration and plant health. -
Planting & Mulch / Rock Work
We install native perennials, grasses, shrubs, and groundcovers. We place rocks, boulders, and accent materials to stabilize and highlight. -
Hardscape, Paths & Lighting
If the design includes stepping stones, paths, or lighting, we install those after plants are in place but before final soil smoothing. -
Flush, Inspect & Adjust
We run water tests (hose or simulated rainfall) to ensure ponding is as expected and overflow works properly. We adjust grading or rockwork as needed. -
Establishment & Follow-up
During the first year, we monitor, water, weed, and check infiltration. After that, your rain garden should become a reliable, functional, and beautiful feature.